Something you need to consider when you plan for a few days or more in the wilderness, is dealing with the added challenges a snow event can bring. You won't necessarily need more tools than usual if you packed your survival backpack properly, but you will need to learn some skills applicable to camping in the snow.
For example, it will be more difficult to build a campfire for cooking and keeping warm in a cold and moist environment. How are you going to get a fire started when all the twigs and branches are covered in wet snow?
In this article, we will go over how to make the fire as well has some cooking tips, the tools you need to have with you, and even how to make charcloth to bring with you.
Let’s go down the list of tools first, and then I'll go over why they're needed:
- Folding hand saw - can be found in any hardware store.
- Small axe - A 1 pound camp hatchet will do. You can Replace one at Cabela's for under $20 (ditto on the folding saw)
- A quality knife with sheath-Becker Bk2 is very good option
- Flint and with large forged steel striker-Also some charcloth though we'll go over tinder alternatives if you don't have any.
- Army mess kit with a couple pans, spoon, and fork for cooking.
Some other essential items for your survival bag would be:
A light sleeping bag with extreme rating of 0°C/30°F or lower depending on the condition of the environment you're planning for. This can be strapped to the outside of your backpack.
- Rain poncho military grade- can be used as a tarp and/or building an emergency shelter.
- Emergency mylar blanket.
- Small first aid kit with essentials.
- Orienteering compass.
Replaceing Firewood Using Wilderness Resources
In dry conditions, burnable wood is easily found in the outdoors. When the ground and trees are covered in snow, you'll have to work a little harder to access dry wood.
With the folding hand saw, cut several branches from a nearby tree. These will likely be wet on the barks surface, but after dividing the branches into 12-18 inch segments, you will use the camp hatchet to slice off the outer wet layer cutting vertically downward, leaving the dryer inner core wood.
You will leave most of these segments as larger pieces of firewood. The remaining pieces are for tinder. With your knife, shear off ribbons of shaved wood (a natural kind of jute twine), for the initial fire start up. If you brought jute twine with you, be sure to unravel the strands into smaller individual strand fibers and roll these up into a kinder bundle for later. Next, slice medium sized kindle pieces with the axe to place on top of the tinder ball you made in the last step.
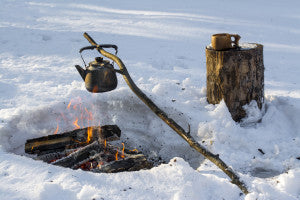
*Tip: You can also cut 3 one inch diameter poles about 3 feet long to fashion into a tripod, so that you can hang a pot or coffee can over the fire for heating up liquids etc. Use damp wood for this so that it resists burning.
Set these pieces on the Rain poncho I mentioned earlier to keep them as dry as possible.
Making a Woodsman Grill
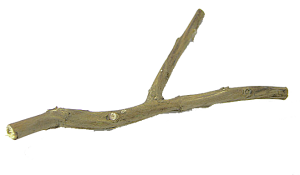
You can fashion a rustic grill from branch pieces to put over the fire. Replace a green wood y-shaped small branch (about 30 inches long and an inch or less in diameter), to use as your grills handle. Peel the bark off with your knife as before, only this time, shave only the outer skin to expose the smooth green wood that will be resistant to burning. We'll call this piece part A.
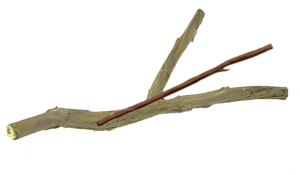
Next cut another piece of greenwood about 20 inches long and peel of the bark as before (Part B). This piece will be placed down the middle of the y-shaped section as a support for the next 3 pieces you will cut. These will be placed perpendicularly over the y-shaped branch you already prepared.
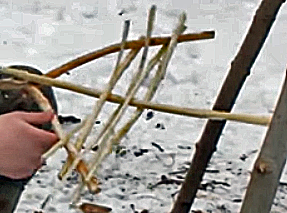
These 3 sections should be twigs less than 1/2 inch in diameter and about 15 Inches long (dependent upon the width of your Y section of part A). Peel off the bark as before, and place them perpendicularly over the top of piece "B" and then under the outer Y sections (part "A") to keep the pieces stable. The dampness of the green wood should keep the grill from catching on fire while you're cooking meat. Now you have a woodsman grill for your cooking fire, rustic and temporary, but gets the job done.
 Building the Fire
Clear an area free of snow for a fire pit if it's not too deep. If it is, then you can saw more wood branch segments to use as the base of the pit to build your fire upon. Now you will gather your Flint and Steel fire starter, and charcloth or other tinder you've created in the previous directions. Have the kindle pieces and bigger log segments nearby.
Don't have a Flint? No problem. I'll go over how to Replace rocks that can be a substitute for flint in
another article.
Begin striking the steel striker on the flint piece. This will ignite sparks that shoot onto cloth or shaved tinder bundle, which will start to smolder. You want to strike downward with the steel against the sharp edge of the flint piece. The friction causes the steel to come into a molten state, and with the steel moving downwards the spark is thrown upwards onto the tinder bundle. As you're doing this, blow lightly as the bundle builds up heat and catches fire (don't rush this).
Most Flint and steel kits come with charcloth, but if yours doesn't, or you just need more, I will go over how to make your own later in this article.
Once the tinder has caught on fire, place it on the fire pit you cleared earlier, and begin adding the small twig-sized pieces of wood over the flames in a teepee or cone shaped pattern to allow plenty of oxygen. As these pieces begin to flame, you can keep adding the bigger wood pieces until you have stable campfire going.
At this point you will be able to heat up food that you brought with you. I prefer to have some food of substance with me so I'll bring meat that will keep for the 1st few days especially in a cold environment. I'll pack it salted and frozen, usually cut into strips that can be easily cooked. I'll bring the usual backpack essentials too like trail mix, nuts, seeds, and freeze-dried fruits and veggies, but I can spoil myself a little with red meat or poultry.
To be safe, I'll cook my meat the first evening since I don't want to chance a bacterial infection in the outdoors and it also reduces the possibility of bears and other critters being attracted. If you are skilled at trapping or fishing for your food in the wilderness, then you don't have to bring any meat with you. This will make that woodsman grill of your all the more useful.
Making Your Own Charcloth
How do you make char cloth yourself? It's fairly easy.
- cut up a few pieces of linen cloth, for example a 100% cotton shirt or denim blue jeans - just nothing with synthetic material in it.
- Get a metal can, preferably tin like a breath mint container, but any metal will do - just be sure to clean it out.
- Punch a small hole in the lid of the can with a common nail so smoke and gases can exit the can once you start to heat it up. The hole shouldn't be large enough to push a pen through or too much air can get in and set the cloth on fire.
- Cut the cloth pieces into roughly 2 inches square as this a good size for use in fire staring. Make sure they aren’t big enough to roll up in the container or they won't char evenly. A larger can and larger pieces of cloth would be better if you have a moist tinder bundle as it will take longer to catch fire, so consider having both sizes on hand.
- place the pieces of cloth flat into the container making sure there's a little space for the lid. Having to tamp down the lid would limit the amount of oxygen needed.
- Now you will need to have your heating source ready. I use my little pocket rocket camping stove outside as this needs to be done in a well-ventilated area that is fireproof with a non-flammable ground area. You could also use a bed of hot coals or even do this on your inside stove, but be absolutely sure there is proper ventilation as the cloth will give off potentially-toxic smoke.
- Light your heat source and turn the flame or element to its lowest setting. Now place the container on the heat source making sure the heat isn't too high or the cloth may catch on fire. In about 5 minutes it should've started emitting smoke (this is why I wouldn't want to do this indoors).
- When it stops smoking you can turn off the heat source. This could be anywhere between 10 to 30 minutes or more, all depending upon your environmental conditions, heat temperature, size of can, etc., but it's usually finished in about 15 minutes total. Grab the nail or tool you used to punch the opening in the lid, and place it back in the hole to prevent oxygen getting in and possibly causing the cloth to ignite.
- The container will be very hot now so let it cool sufficiently before you remove and open it. The pieces of cloth have now converted into carbon charcloth (black with fiber patterns still showing) and are now ready to use. *Tip - when putting the charcloth onto the flint for sparking, fold it in half to prevent it from burning up too fast.
Now you can be prepared with any amount of charcloth you’ll need for an outing by making it yourself.
Article written by John David Keys. An avid backpacker and camping enthusiast, John has spent weeks at a time in the Northern California wilderness of the Trinity Alps, Siskiyou Wilderness, and Lassen Volcanic Park as a Plant Identification Guide. In addition, he has attended many other wilderness outings as A Boy Scout ASM event Leader. A true believer in “hope for the best but prepare for the worst,” he is self-taught in the practice of survival preparation and is the Founder and Publisher of the website SurvivalCompanion.com.