10 Brilliant Food Storage Spots You Probably Haven’t Thought of Yet
A couple years ago we sent a survey to over 100,000 loyal Emergency Essentials customers to ask all about their food storage priorities and goals.
We discovered something we thought was pretty remarkable.
A surprising number of people reported their top goal was storing up a year supply of food but that they’d run out of room to store it.
They had the desire. They had the money. They just didn’t have the room.
And it got us thinking…is it possible to store an entire year’s worth of emergency food in a space that by most measures was not meant to fit it?
Below is our answer—10 incredible food storage spots (some of which we’re willing to bet you haven’t thought of yet). They’re making it possible for families all over the country to store up tons of food in living spaces as small as just a few hundred square feet.
Our Top 10 “Out of the Box” Methods of Fitting Emergency Food
Before we begin, let us say that on their own, few of these methods will be enough to store a year's supply. But combined—and on top of other storage spots you may already be using—they should be enough to push you over the top.
1. Empty Suitcases

Empty luggage you've already got in storage is a great place to stash emergency food.
If you’re not already using it for other storage, there are few better places to pack away long-term food than inside luggage.
A large suitcase measures about 30 inches high, 19 inches wide, and 11 inches deep (not to mention stretchable space in pockets).
That’s twice as high and wide as one of our 30-day buckets!
How much can it fit?
You should be able to fit about a month worth of pouches in a single large suitcase. Since we happen to be at headquarters, we thought we’d give it a try and see.
We started with a suitcase.
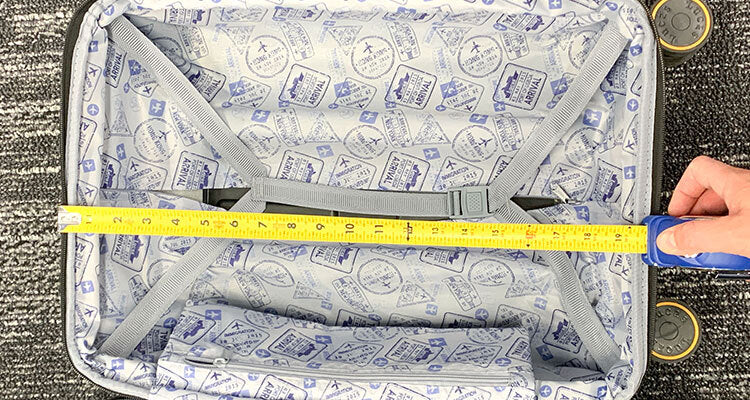
It measured 18" high, 13" wide, 8" deep.

And easily fit two week's worth of pouched emergency food.

And that isn't counting anything you could fit in side and front pockets. All told, a larger suitcase could easily fit a month's worth of food pouches.
If you’ve got a family and few empty suitcases stored away, you may be able to fit many months of food without taking up an extra inch of storage space elsewhere! Just make sure to keep them in a temperature-controlled area and away from water.
2. False-Bottom Drawers
A false bottom in a dresser drawer (or drawers) makes extra space for emergency food.
OK, hear us out—this isn’t quite as spooky as it sounds.
You may have drawers in your home you can eek a little extra space out of by building a false bottom.
It’s simple enough in theory, and some people swear by it. You simply cut a board to the size of your drawer bottom, insert a spacer in each corner, place the board on top of the spacers inside your drawer, and voila: you’ve got anywhere from one to two inches of extra storage per drawer.
This video from TheKingofRandom.com walks you through the entire process. It’s surprisingly simple and easier on your drawers than you might think. the video also shows a simple method for locking the false bottom if you’re concerned about food security. It’s a nice touch.
How much can it fit?
Drawers come in all shapes and sizes, but a large dresser drawer will often average around 30 inches wide and 18 inches deep. To discover how much a space that size would fit, we whipped up a little demonstration.

We taped out a drawer-sized space on a table to see how many food pouches it would fit.

We put down our pouches. Flattened, they're a little over an inch high at most, which means you may be able to stack them two-high per drawer.
We fit 10 pouches in our mocked-up drawer, so a large six-drawer dresser could fit at least 60 pouches—that’s over one month of food in a single dresser!
3. In a Wall Cavity
Here’s another option that isn’t quite as scary as it sounds.
If you're out of room for shelving, building some space inside your wall could be the perfect solution. Depending on the age of your house and the region you’re in, there should be empty space between your interior walls—these are called “wall cavities.” They’re probably full of insulation, wiring, and plumbing. Some of them may be empty.

For recessed shelves you’ll need at least 6 inches of depth for #10 cans but only 3 inches of depth for canned foods.
The first and most important element of a project like this is safety. We recommend making an inspection hole once you’ve picked your spot and then using a small mirror and flashlight to make sure you’re not cutting into electrical, HVAC, or plumbing.
For more information on how to build extra storage space into an existing wall, check out Better Homes and Gardens’ instructional on building a recessed shelf.
For a little extra cover and security, Lowes has a page on how to build a hidden storage cabinet into your wall behind a painting. It adds a little more of a "wow factor" to your recessed shelving. It also increases food security, which is never a bad thing.
How much can it fit?
The sky's the limit here, but if you’re careful and pick your spots right, you should be able to open up a space for quite a few canned foods and/or pouches. If you get creative, you may even be able to fit #10 cans (if the space is deeper than six inches, which it may not be).
4. A DIY Coffee Table

Coffee table hack! Emergency food buckets, a hard surface, and a tablecloth or other covering...
There are plenty of hacks online for fitting food storage into furniture…
But how about creating furniture from emergency food?
That’s exactly what one of our long-time customers been doing for years—with an ad hoc coffee table that uses food buckets as a base. They’ve got three months of emergency food in the middle of their living room, hidden in plain sight!
All you need are food buckets turned upside down on their lids—four to six is about the right number. They create a remarkable flat, even surface. You’ll want to remove the handles as well (but make sure to save them, they may come in handy).

Food buckets turned upside down on their lids make a remarkably flat, even surface.
Next you'll need a hard surface and some way to secure it to the buckets to it. Command strips, cyanoacrylate glue, or even thin wood screws could work.
For the purposes of this demonstration we’ve used cardboard—not recommended for your finished build. You can see how flat it rests, though!

You'll need a hard surface to place over the buckets. We used cardboard for this demonstration but wood or plastic should work nicely.
Then it’s a matter of dressing up your table. You could use more planks to build out a frame and then finish the wood. If you’re in a hurry, you can toss it all under a tablecloth like we did. Get creative!

5. Behind Books on Your Shelf
If you’re the kind that likes to keep books around the house, you may have a trove of empty space that’s just the right size for canned food and sealed pouches.
You’d be surprised at how much food a single shelf can fit.
Bookshelves come in a range of sizes, but for the sake of discussion let’s say yours is 30 inches long and 11 inches deep—just an average-sized bookshelf.
Most books range from 6 to 8 ½ inches wide, meaning you’ve probably got enough space to fit canned food behind your books. If you have nice, tall hardbacks you can easily stack a row two cans high behind them without anyone being the wiser.

Tin cans can easily be stacked two-high behind books on a shelf.
Pouches are an even better fit. The pouches in our year kits are creased on the bottom to stand up on their own.
The food pouches in our long-term kits stand freely on their own, making them the perfect fit for storing behind books on a shelf.

A flat, creased bottom allows these pouches to stand freely.

These pouches come in a range of sizes, but at about 1 to 2 inches wide they can also easily stack (or double stack) behind books.
How much will it fit?
With that 30-inch shelf we mentioned, you could fit at least 10 cans—20 if they’re double stacked—and four to 12 pouches. That means a bookcase with five shelves could fit at least 50 cans and 20 to 60 pouches
6. Combine Buckets

Combining the contents of food buckets can net you more extra space than you might think.
For logistical purposes, most of our long-term food buckets aren’t loaded completely to the top. This figure isn’t uniform, but you’re likely to find something like two to four inches of empty space at the top of most of them.
How much can it fit?
That little bit of wiggle room can buy you extra space if you’ve got enough buckets. For example, with Emergency Essentials year supply of 24 buckets, you could empty a couple and spread the pouches across the remaining buckets. Your 24-bucket supply just became a 22- bucket supply, saving you about 62” x 15” x 18' of space.
Not exactly an end-all-be-all solution…but combined with some of the other tactics on this list it could be the trick to push you over the top.
7. Inside Your Stairs

It takes some doing, but space for emergency food can be made inside or under stairs.
We considered leaving this off the list—if only because it take some significant money and effort to pull off…
But if you’re the super-crafty type (or willing to pay someone who is), you can hoard away quite a bit of food in “stair drawers.”
Others have done this concept more justice than we could. Check out this article/video on Instructible Workshop to see how to build your own stair drawers. You can also create storage space under the staircase like Bill from Family Handyman did.
Again, this is a PROJECT. But if you’re strapped for space and serious about food security, it’s one that could be worth undertaking.
8. Behind Your Couch

It may not work for everyone, but with a creative touch, couches can hide lots of long-term emergency food.
Depending on your sense of “feng shui,” this may not work for you, but most of us have at least a little space beneath and/or behind our couch. To prove the concept we placed six of the buckets in our one-year supply (that’s ¼ of year’s supply if you’re keeping track) behind our couch here at headquarters.

The easiest place to store food buckets might be behind the couch rather than under it. It will create about 10 inches of space between your couch and the wall.
Of course, aesthetics is the real drawback here. We covered the buckets with a tablecloth for our little demonstration.

A side view of our emergency food buckets, covered in a table cloth and stored behind a couch.
You might try using pillows or large, rolled blankets to cover the buckets. If you’ve got the time and inclination, we’ve seen customers and bloggers who’ve actually built out wood frames for coverage. They don’t look half bad and double as shelving—a nice spot for coasters and remotes!

The buckets are surprisingly well hidden when viewed from the front.
How much can it fit?
In our demonstration, we didn’t run the entire length of the couch so could easily have fit another six buckets or more—that’s half-a-year’s supply. If you got serious about this tactic and placed your buckets behind a nice, large sectional, you could fit nearly an entire year of food behind your couch alone!
9. Hanging Space-Saver Bags

Storage bags compress empty gaps and make it easier to keep a lot of food in smaller spaces.
If you haven’t discovered the magic of vacuum sealed space savers—my friend, you don’t know what you’re missing.
Basically a vacuum sealed bag you can hang in a closet (or slide under a bed), these save space by compressing your storage and eliminating all the little gaps that take up a lot of room. The concept works well for clothes, but there’s no reason it can’t work for food storage pouches as well.
Just fill a space-saver bag with as many pouches as you can fit, suck out the air with a standard vacuum cleaner attachment, and you’re good to go.
10. Buried in Your Yard

Food-grade buckets with pouches inside can be buried for the duration of their shelf lives.
If there’s a “one-shot” solution on our list, then this is it.
If you’ve got enough property and can dig a hole large enough, our food-grade buckets with 4-layer, sealed pouches, can be buried and stored for the duration of their shelf life.
As a warning, food kits in totes are permeable to moisture and elements and cannot be safely buried.
There are factors to keep in mind, of course.
- If you live in an area with thaw cycles, you’ll want to bury your supply a bit deeper.
- Educate yourself on the water table in your area and keep the buckets away from sprinkler lines—they can withstand moisture, but better to play it safe.
- Since they could be in the ground for decades, be cognizant of proximity to trees and roots.
- It would also be helpful to wrap your supply for a little extra protection as well—tarp will work.
And it goes without saying: if you’re digging, check with the city to make sure you don't run into any lines.
14 comments
Lynn
Food preparedness for me includes edible plants which can be planted in plain sight in flower beds. Perennial edibles such as asparagus, rhubarb, multiplier onions come to mind. Malabar spinach is a vining spinach which reseeds itself and most people don’t know what it is. There is also a perennial green that used to be found in European cottage gardens called good king Henry. Plant a few in your flower beds! Plant a few blueberry bushes, blackberries, apple trees, pear trees, plum trees fig trees, or grapes in the woods or even some perennial edibles. Voila! A secret garden.
Linda Arzola
Everyone has hollow core doors. Pop off the back, fill with pouches packed as tight as you can and reglue the back. Hang it back up- presto chango!
Northwoods Cheryl
I store a LOT of dry goods in the garage inside 80# size “Vittles Vault” containers with the Gamma Seal lids. They are sold at pet food sites.
Stephen Griffin
One may build shelves about the circumference of rooms, a can or two or even three heights below the ceiling and stack an awful lot of food there: hundreds of cans or buckets or both. Behind the flat screen also works where built-in entertainment centers did not anticipate the future very well and the behind the books is a huge space in my place.
I have plenty of food storage space: it’s water that is my issue here in the desert. I do have a couple of old sheds our back, by the solar farm, where I’ve stacked water bricks, but there is only so much space available and the bricks are not cheap. My solution is the “bury it” option mentioned for food, I simply save every resealable glass jar and bottle that I come across, wash/rinse them and wax seal over metal lids and caps. Once a large number has been collected in the garage, it’s time to break out the shovels. I typically include sufficient purification materials within the hole, jic.
Cindy
I came across a diy platform bed frame where the base can lift up for storage. This would be a great idea for secret storage!
Leslie
Great info!
Nancy
Great article with some very useful storage ideas. Another great storage space for #10 cans especially, is under the bed. Raise the bed to accommodate the height of the can (7") and you can store a lot of cans. Trim out with a bed skirt and your storage is out of plain view and now stored in a cool dry place as well. If you don’t want to raise the bed but want to store pouches, then use plastic ‘under the bed’ blanket units you can get at just about any store (a lot of pouches can easily be stored this way).
M.J.D.
The suitcase idea is great. And wheeled ones great for evacuating, if needed. I didn’t see under bed idea. Use strips of heavy cardboard or thin wood which can help by putting cans on top and shove a row of them under bed, and easily pull a row out when needed.
Beth Taylor
When storing things behind couches, be aware of heating outlets, or baseboard units, including hot water heating units. They can really heat up your food storage, which is bad. And lessen the effectiveness of the heating units.
My favorite place to store #10 cans is in the 6 pack boxes, under the beds. If they are pushed together, I can still vacuum around the outer areas. When you flip your mattresses is a good time to vacuum the top of the boxes.
Lawrence
First of all…GET OUT OF THE CITIES!!!
Build ‘coffins’ with poly rope handles, put your longterm storable food buckets in the ‘coffins’
and bury them. Maybe dress the area up to look like a pet cemetery so the exact spot of
burial will not be lost. Six inches to a foot of earth over them will maintain a constant temperature year around.
Brandie Nelson
We got rid of the metal bed frames and use cases of #10 cans to put the box springs on. They’re the same height and you can fit between 12-20 cases depending on the size of your bed. A simple bedskirt hides the boxes and no one needs to know. And you can leave an empty space in the center to keep sensitive items.
Jessica
For our guest room, we bought an open frame box spring. Just some flat metal pipes that get covered in a zipper fabric bag. That box spring holds quite a lot of pouched food, water, and first aid supplies while looking completely normal.
Terri
I have used all of these except the in wall shelves. You can fit 18 cases x 12 cans of food under the couch. 8 cases fit under a clawfoot tub. Raised beds in your garden with a shelf under can hold several 5 gallon buckets full. Lots of places available if you “see” a room with new eyes. Great article
Karen
If you can purchase an older home that needs some remodeling, the sky’s the limit as to where you can hide your stuff…Just think like a squirrel. Overstore, store it in many places, and robbers will not get it all…