Transform a handy little foldable crate (you can pick it up at Walmart or Amazon) into an amazing year-round garden—PLUS tons of tips to improve your indoor gardening.
Not long ago we received a question from one of our dedicated community members, asking if we thought he could grow a respectable emergency garden in his apartment using this GreenMade InstaCrate he bought for 15 dollars at Walmart.
So we turned to our prep experts here at Emergency Essentials, and come to find out it’s not only possible—it’s a great idea!
This crate in particular is a super-handy little vessel. It’s easy to carry but sturdy enough for a full-blown garden. You can fold it up between “growing seasons,” stow it away under a bed or in a closet, and use it again and again.
That’s not to say you can just fill it with any-old soil, toss in any-old seed, and expect it to successfully grow. We’re going to show you how to choose the right seed and take the right steps to transform this crate into an amazing year-round garden.
Choose the Right Seed
So how much can you grow in a crate of this size? Here are some tips for maximizing your crop.
USE SEED THAT THRIVES IN SMALL SPACES
This goes without saying, but look for seeds that grow well in cramped quarters—the smaller the better.
With our InstaCrate, we’re working with dimensions of a little over 20” x 14”. For example, if we were to plant only carrots in our crate (which require 2 to 4 inches between plants and 12 to 24 inches between rows) we’d be able to sow at very most two rows with 7 plants each.
It may not sound like much, but if you choose plants that yield lots of vegetable per seed, you can maximize your yield per inch.
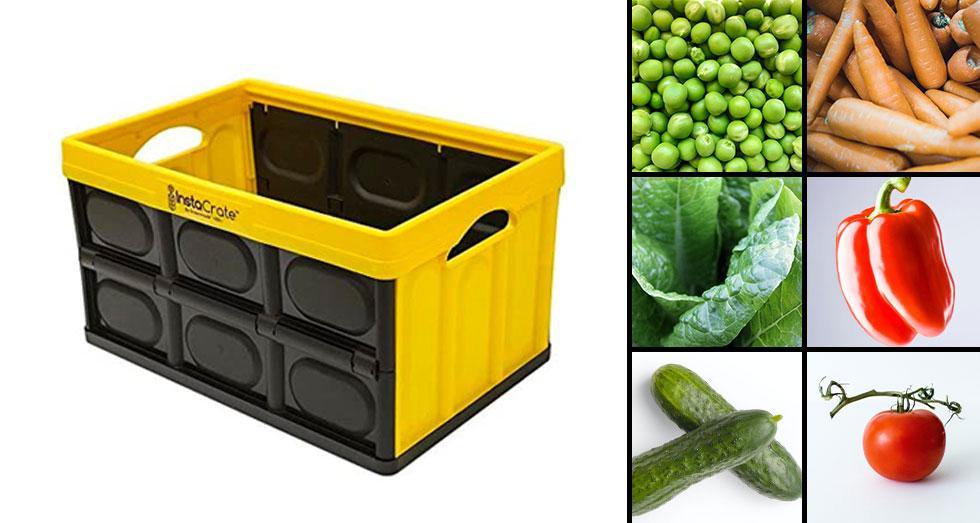
Here are some great options for individual vegetables that take up relatively little space. (You can also buy seed packet bundles specially made for small gardens.)

Champion of England pea – A vigorous little pea with 4” x 3/4 “ pods grown on a 5” to 7” vine. Allow at least an inch between multiple rows.

Calypso cucumber – A “miniature” cucumber, the Calypso measures just 4”. They’re disease resistant and excellent for eating raw or pickling. Space at least 8” with 3” to 6” between rows.

Pimento pepper – Pimentos are tiny (3” x 2.5”), mild, and sweet. They grow on a 26” to 30” upright plant. They’re sweeter than a bell pepper great for canning and produce heavy yields. Plant about at least 18 inches between rows.

Mexico midget tomato – A super-luscious cherry tomato. One plant can produce hundreds of fruits over a single growing season. Allow at least 18 inches between plants and at least 20 between multiple rows of tomatoes. This may take up the majority of a single crate but is very productive.

Baby spinach – Crunchy, bite-sized spinach leaves that were just made for small spaces! Plant seeds a couple inches apart and about a foot between rows.

Caracas carrots – Sweet, coreless miniature carrots measuring between 2” and 3”—perfect for indoor gardens! Plant at least 2” apart with at least one foot of space between rows.
SPROUTS AND HERBS
We listed vegetables first because we want you to be able to maximize your yield for edibles you can make a meal of. But sprouts and herbs do an even better job in small gardens because they take up less space. Here are some options:

Chives – The perfect seasoning for everything from eggs to salads, chives do relatively well indoors. Plant 2” apart.

Mint – Mint leaves come in so varieties—spearmint, chocolate, banana—that choosing is half the fun. They also grow like wildfire with just a little bit of effort. Note that mint does better with a little misting.

Basil – An exceptional container-grown herb, basil is one of the most widely-used herbs there is. Keep in mind that it likes heat and light, so provide it as much of that as you can (see our section on nurturing with light below).

Bonus crop: Sprouts!
They don’t necessarily need to take up space in your crate garden (they grow easily in little water trays), but sprouts are the perfect complement to your vegetable supply. They’re packed with micronutrients that are so critical to health in a long-term crisis. They’re also full of amino acids that aid in digestion.
And most important for emergencies, they grow from seed to sprout in three to five days! That means you can potentially plant your sprouts after the disaster has struck and eat them while you’re still sheltering in place (just make sure they're clean).
Check out this super-handy, self-contained sprout kit with everything you need (short of water) to immediately grow sprouts including seeds, stackable trays, and instructions for use.
How to Grow Your Garden
Now that we’ve covered some of the best seed for the crate, it’s time to talk about steps and best practices for growing them.
STEP 1: GET YOUR TOOLS
For smaller gardens, especially in an apartment where you have little space, minimalism is the key. Here are the very basic gardening tools you must have:

Hori Hori Gardening Knife – To keep your inventory light, you should start with a Hori Hori gardening knife. These little gems are multi-purpose: a gardening knife and trowel in one. What they give you is a narrow trowel with one sharp side for knife work. Many even come with inch and millimeter notches in the blade for measuring soil depth.
In the absence of tools items like a shovel, Gark, or oscillating hoe, this will be the foundation for your gardener’s toolbox. You’ll be using it for digging, manipulating and cutting soil, removing roots, and transferring plants if you need to.
Handheld fork hoe – You’ll be using your fork hoe to loosen the soil when you’re planting. It can also be used to help remove roots. Test it out in your hands—is the grip comfortable? Is it at a weight you feel you could handle for extended periods?

Bypass pruning shear – There are lots of types pf pruners, but if you’re choosing just one for a small garden, go with the popular “bypass” shear. These make a very clean cut with two blades that slide right over eachother like scissors, and are cut nicely with branches of an inch or less in diameter.
STEP 2: PREP THE CRATE
Because the InstaCrate is not made specifically for gardening, there are modifications you may have to consider to rig it for proper drainage.
Small planters like this don’t absolutely need drainage, but it’s awfully helpful, especially if you’re not an experienced gardener. There are a few things you can do ensure proper drainage.

Quality potting soil (not garden soil) – Your crate is going to need soil, and quite a bit of it. Go with a potting mix that contains organic matter like compost, peat moss, and bark chips. These give the soil plant-healthy nutrients and a nice pH balance.
Perlite soil – If it doesn’t come included in your potting soil, we suggest mixing in perlite soil as well. This is organic and very lightweight and prevents compacting that makes it hard for roots to grow through the soil.
Lava rocks – Another trick for encouraging drainage is to line the bottom third or so of your crate with lava rocks. Like a French drain, this creates little nooks and crannies for water to slide through. It’s important not to overwater plant beds sitting on lava rocks, especially if your vessel doesn’t drain well, as it can collect water and make soil soggy.

Coconut (Coco) coir – Made from the husk of coconuts, coco coir is a hydroponic medium that looks a whole heck of a lot like real soil. One of the big differences, though, is that coco coir is far better at holding water. I can absorb 10 times its weight in water, which can be so helpful in indoor gardening where untended plants can dry out quickly.
Punch holes – There are ridges along the bottom of the InstantCrate with openings that will assist in drainage, but you may want to punch some extra holes just in case. The easiest tool for this would probably be an electric drill with a twist bit. Two tips! To avoid cracking or damaging the walls and structure of the crate, stay away from the folding seams and start with a small bit then work your way up in size.
Moisture tray – The InstantCrate is ridged along the bottom, and provides just enough elevation to allow water to find it’s way completely out. Whether you’ve punched holes or not, you’ll want a receptable to catch any water. The tray needs to be at least 22x15 inches long and flat. Here’s a dog crate replacement pan that would work well. Pet bowl mats and shoe trays can work too.
STEP 3: PLANT
With right seeds selected, the tools you need, and quality potting soil (with drainage), you’re ready to plant!
The first thing to watch out for is seed depth. Your seed packet should give you information on that. Generally, you want to plant at a depth two to three times as deep as the width of the seed. That means very small seeds will need little more than just a thin covering of soil. Larger seeds should be buried about an inch down.
Apart from the basics of planting, keep the following in mind:

Compatibility – Not all plants are meant to be grown side by side. For the best results, try to find plants with similar water and sun requirements. Height matters too. Planting very tall vegetables like tomatoes next bush beans is recipe for problems—the tomatoes will eventually shade right over the beans and block their light.
Spacing – When you’re in a limited space like our crate, this might be the most important factor in the success of your crop. Some plants don’t need much space at all. Baby leaf spinach can be planted just a half an inch away from the nearest neighbor. Tomatoes, on the other hand, with their expansive vines, require two feet or more of space. Remember to plan for spacing between plants themselves, and between rows. Check out an online plant spacing guide for more information.
Plants that get along – It’s regarded by some as a bit of a wives’ tale (at least not supported by much scientific evidence), but gardeners through the centuries have reported that certain plants thrive or struggle when planted together, based purely on their chemical compositions. This a phenomenon known as allelopathy. Since you’ll be planting different varieties side by side, it’s worth reading up on.
Soil temperature – Even in a controlled environment, the temperature of your soil can make a big difference in how well your plants grow. Each plant has its own ideal soil temperature, so make sure to do your research. Group seeds that favor similar temperatures. In an indoor environment you can impact soil temperatures by moving your planter to warmer and cooler portions of your home, using peatmoss for warmer soil, or building a simple cold frame tent.

Air circulation – When plants grow outside, rain and wind clear dust, pollen, and other gunk that can clog up pores and inhibit growth. Proper air movement indoors can replicate these forces and help contribute to a healthy garden.
STEP 4: NURTURE WITH MOISTURE
Here’s a controversial statement: seeds need water to survive! Most preschoolers can tell you that.
But did you know that water is also the biggest seed killer there is? Overwatering causes roots to suffocate and start to rot.
Moist, not soggy – To make sure you’re not overdoing it, follow this general rule: keep the soil moist, not soggy. Feel the soil; when it sticks to your hand and you can mold it into a ball, it’s moist enough.
Especially in the beginning stages and for seeds closer to the surface, use a spray bottle or mister to avoid disturbing the soil and unsettling the seed. Let the soil dry slightly between watering. How often you water will have everything to do with the type of plant you’re growing. Read the seed packet for instructions or find a reputable website for advice.

Mist humidifier – Many plants need humidity to thrive. If you live in a dry area, you might want to consider setting up a cold-misting humidifier next to your planter to simulate proper outdoor conditions and stop it from drying.
Water Temperature – It’s a simple thing (those can make all the difference) but watch your water temperature as you nourish your garden. It should be at room temperature, but not hot. Cold water can discourage germination and growth.
Cover in Plastic – Your mileage may vary depending on what you’re growing, but some people swear by covering the top of your container in a plastic wrap until the seeds germinate. It can create a greenhouse-type environment for the plant.
Wicking – Especially if you find you’re having trouble with too much moisture, you might consider “wicking”—watering your garden from the bottom. It’s an easy method for keeping plants nourished without over-moistening the soil. It can reduce mildew and promote the new roots to grow downwards toward the water source instead of staying at the top.
STEP 5: NURTURE WITH LIGHT
Edible plants need a lot more light than your typical house variety. Vegetables require 6 to 8 hours of direct sunlight—that means without shading from blinds, trees, etc. If you can set your garden near a window (avoid north-facing windows where you can), you’re off to a good start. However, you’ll probably want to consider some supplementary lighting, too. A quality light placed above your plants will do nicely.
Florescent lights – Yup. You can grow plans using good old florescent lights, especially if it’s a supplementary source. If you’re getting good light from your windows but feel like you might need a little more, this is a great option.
High-intensity discharge (HID) lights – Like the name says, these are intense. They give off a lot of light and can get quite hot. For larger plants like tomatoes, though, HID lights are great because they can penetrate well into foliage.

Light-emitting diode (LED) lights – LED lights are energy efficient and produce relatively little heat. They also give off full-spectrum lighting. Because the sun provides a full spectrum of light from UV to infrared, plants have evolved to take cues from different types of lights at different seasons. HID lights, for example, are heavy on the red spectrum which promotes flowering, but isn’t best for plants through every phase of their life cycles. LED lights, on the other hand, emit a full spectrum of light, giving plants everything they need at every phase of growth.
Distance – Generally, LED lights should be about 12 to 30 inches from your plants. This will change depending on the varieties you’re growing and phases of the life cycle.
And that’s it. If there’s anything we missed, or anything you’d add, sound off in the comments and let us know.
Good luck growing!
2 comments
Cheryl G Tuttle
Companion planting is not an “old wives tale”. It is very true. I like the book Carrots Love Tomatoes. I found this out years ago. Planting veggies , onions , herbs and flowers together keeps out the weeds and bugs—especially tomato hornworms, etc. I lost all my tomatoes one year to the hornworm. Never happened again after growing basil and marigolds around the tomatoes. There are other plants that help each other,too.
David
The idea is great. It would be definite space saver for those with limited space, but I wonder if that kind of plastic is able to hold up to being outside in the sun and weather. Some plastics become brittle quickly due to outdoor exposure.
I’m also curious if the plastic it is made from will begin to leach toxins into the soil when exposed to the sun/heat as well (especially in the heat of the south/southwest).
Unfortunately, the product description doesn’t include any specific information relevant to the concern.
I think it’s worth investigating further.