

Many people want to know which method is the best for storing their food, and depending on whom you ask, you will probably get a different answer. Each method has different advantages and disadvantages, depending on what your priorities are when it comes to food storage. We have outlined the basic methods, and how they affect your food storage. So you be the judge of the best method for you and your family, and start getting prepared!
Dehydrated Foods
When food is dehydrated, the water is slowly cooked out of the fruit or vegetable, without actually cooking it. There are three different methods: air-dried, sun-dried, or kiln-dried. Food can be easily sun-dried from your home, whereas the air or kiln method requires more equipment. All methods are very cost-efficient for storing food. Once fruits and vegetables are dried, they are then stored in airtight containers. Usually they are packed with an oxygen absorber, which effectively removes the oxygen, leaving only nitrogen behind.
Advantages:
- Lower price than freeze-dried
- Food is compact--more can be stored in a container
- Food can be dried at home (sun-dried)
- Easy to reconstitute with water
- Food loses some texture when dried
- Some loss of taste compared to freeze-dried
- Need a machine to create air tight seal and add oxygen absorber
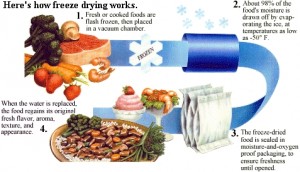
Image Used with permission from Oregon Freeze Dry
Advantages:- Food keeps texture and shape
- Quickly reconstitutes with warm water
- Lighter, for carrying or backpacking
- Keeps full taste and size or bulk
- Higher price
- Need expensive equipment for freeze drying process
- Only cost effective for selective products-- meats, fruits, and vegetables
- Requires more space to store since food remains full size
- On top of an almost full five gallon container, place one-quarter pound dry ice on nonconductive insulating material, such as kraft paper.
- Press lid down gently so some air can escape.
- After about 20-30 minutes, check to see if the dry ice has completely evaporated.
- If not, wait another five minutes and check again.
- When ice has completely evaporated, remove kraft paper and seal container.
- On the bottom of a five gallon storage bucket, place one-quarter pound dry ice under nonconductive paper that can be left in the bucket.
- Fill bucket with food you want to store--wheat, legumes, etc.
- Press lid down gently, leaving room for a small outlet for escaping air (lid will bulge and eventually blow off if air cannot escape).
- When dry ice has completely evaporated, seal container.
- Inexpensive, few tools required
- Can use dry ice method at home
- Can be used for grains and legumes--items that don't need to be freeze-dried
- Dry ice may be difficult to locate
- Dry ice needs to be carefully handled to avoid minor injuries
- Food has to be stored in large plastic buckets that may be permeable to oxygen
- Not the best method of long term storage--bacteria may still grow in carbon dioxide
Comments
harvestright.com has developed a home freeze dryer and they allow for layaway as well. Something to think about… freeze drying at home!!
Hi Ron,
Thanks fore letting us know about this. Yes, we are speaking of Kraft Paper only.
Angela
Please note instruction 5 under the dry ice method "basic on-top" method.
" 5. When ice has completely evaporated, remove material and seal container. "
This is not clear to the novice. We were wondering why to dump the "materials" out of the bucket. Are you speaking of the kraft paper only ?